Chromatic for Storybook
Chromatic, created by the team behind Storybook, seamlessly integrates visual testing into your UI development workflow. Storybook lets you capture every component state and variation as stories. Then, Chromatic automatically executes visual, interaction and accessibility tests on those stories.
ℹ️ Not using Storybook? Chromatic integrates with Playwright and Cypress to transform your E2E tests into visual regression tests.
Set up Chromatic for Storybook
The Chromatic CLI builds and uploads your Storybook to the Chromatic cloud infrastructure and triggers UI tests without requiring any additional configuration.
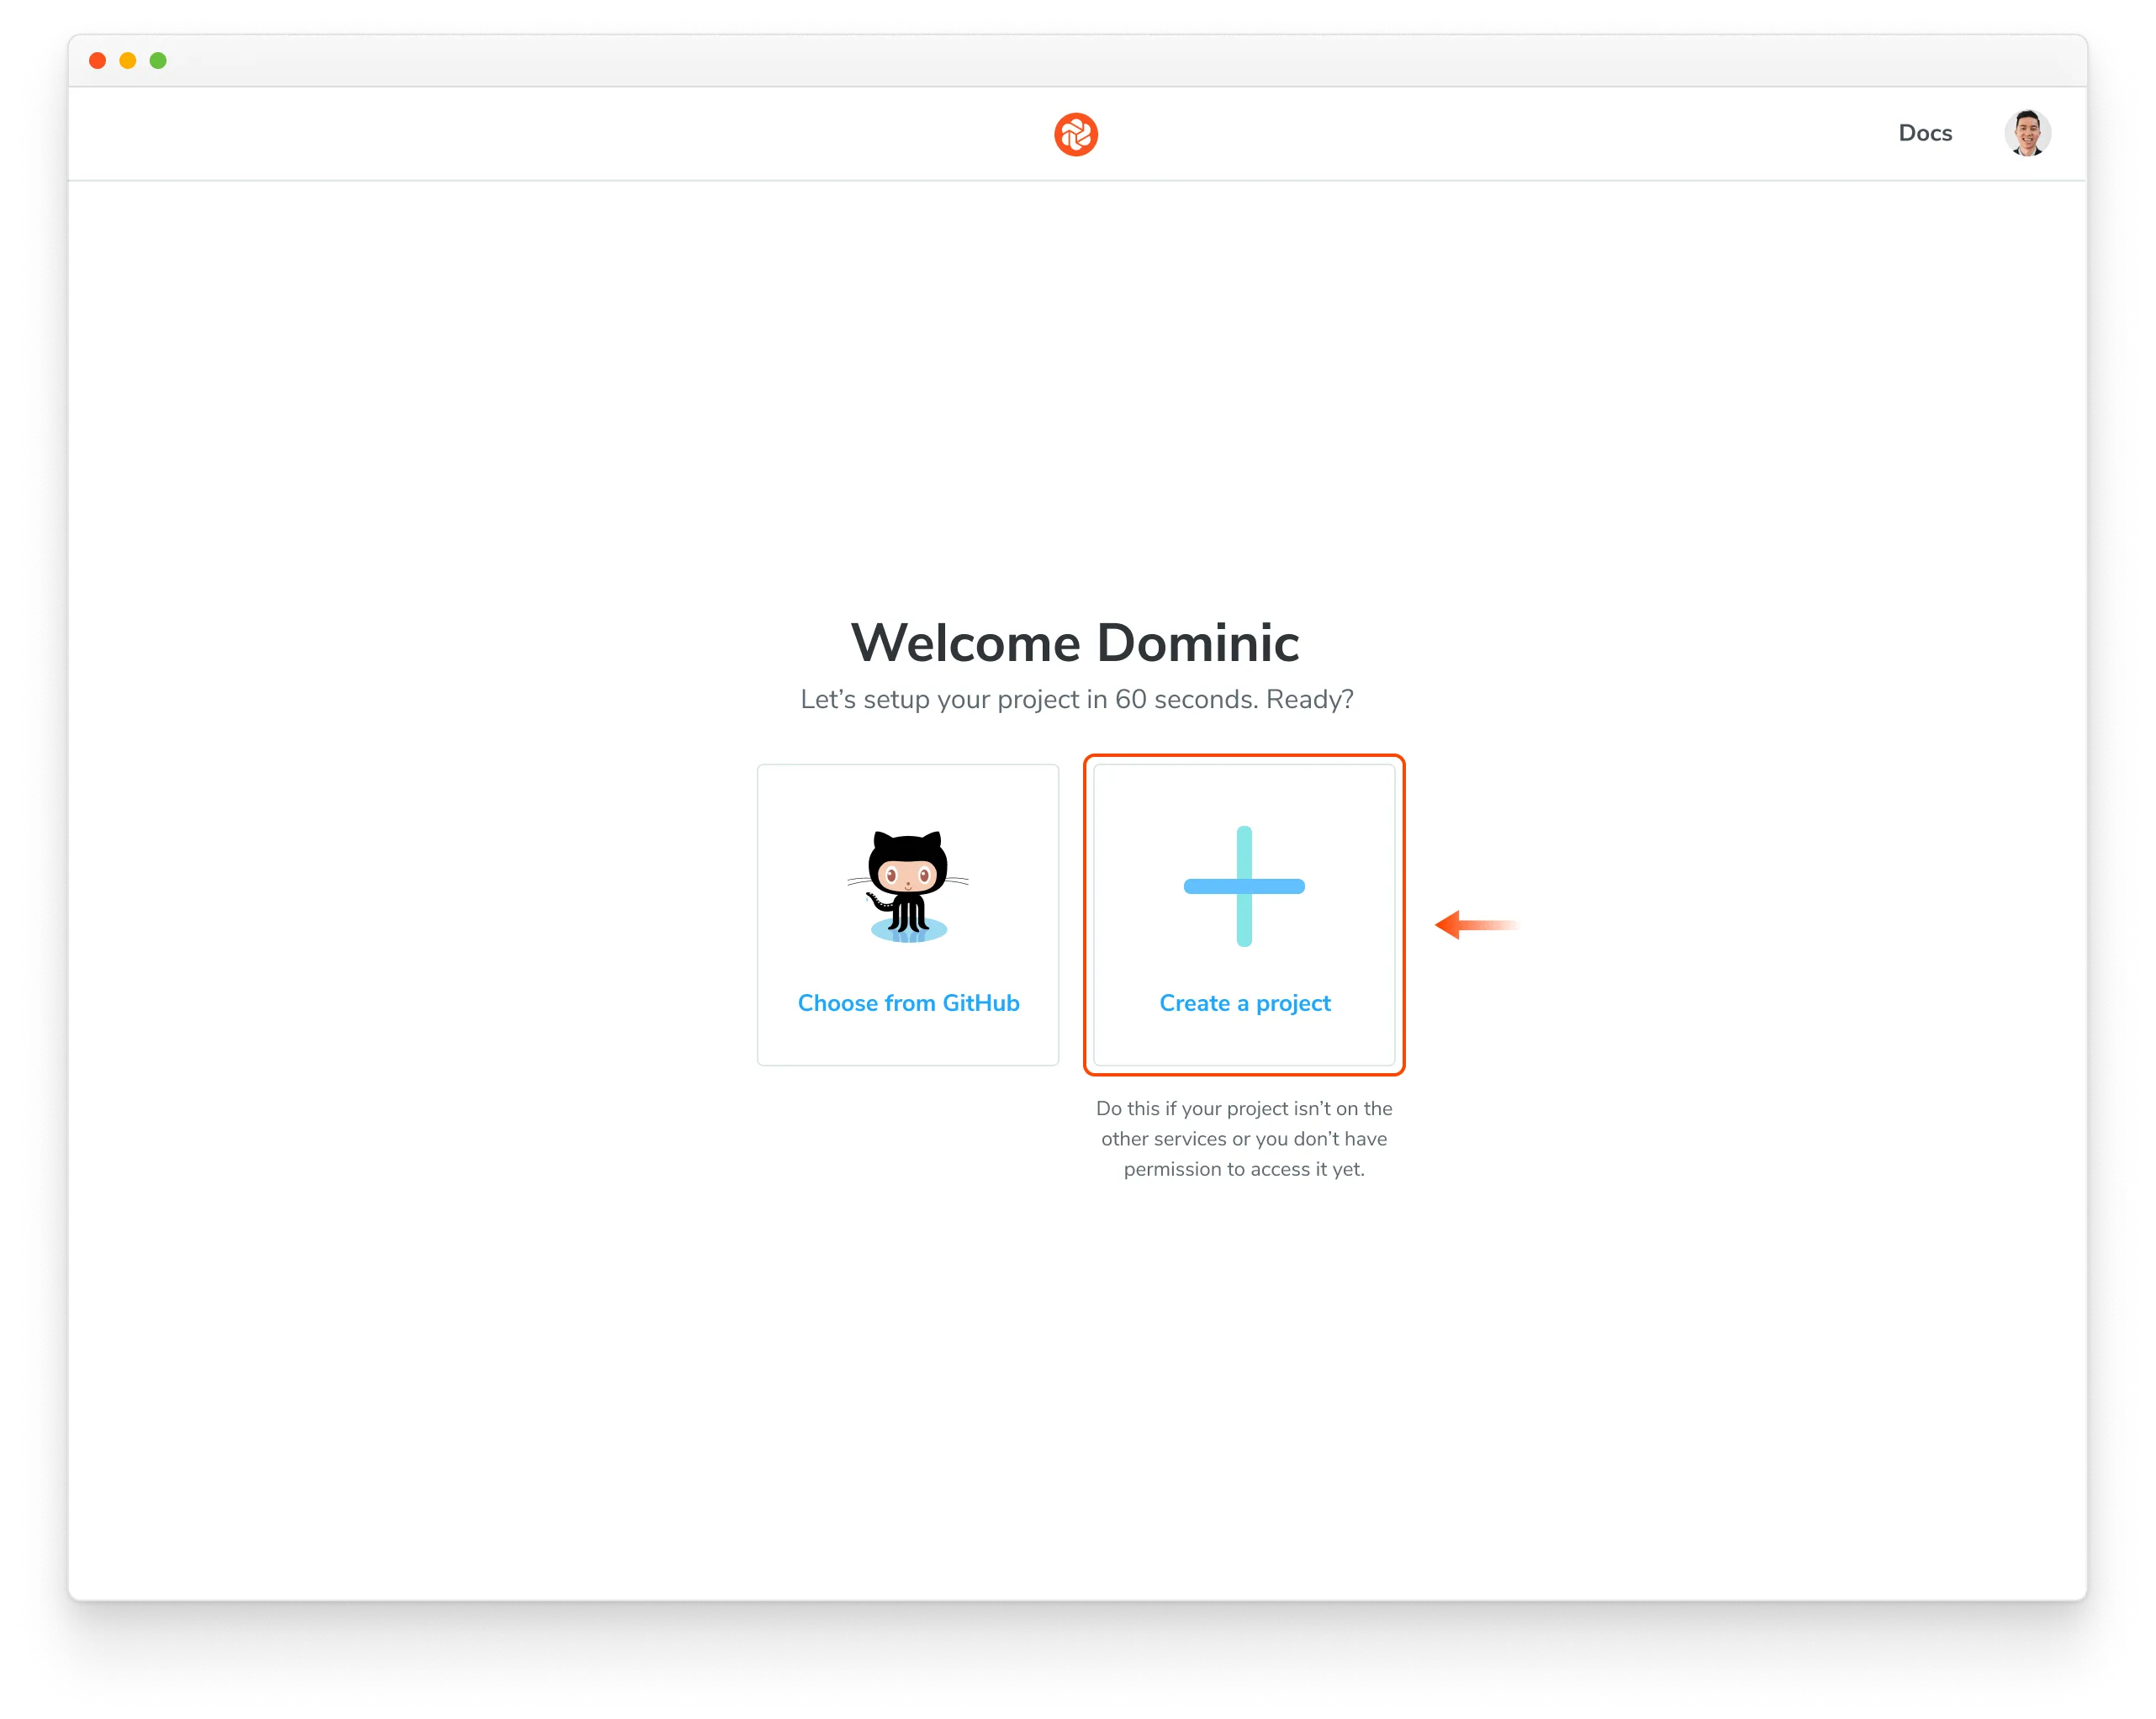
1. Sign up and create a new project
Generate a unique project token for your app by signing in to Chromatic and creating a project. Sign in with your GitHub, GitLab, Bitbucket, or email.
How to setup Chromatic if you require SSO, on-premises, or have a different Git provider.
“Unlinked” projects are the way to go if you use an OAuth provider or Git host that Chromatic doesn’t support yet, or if you need an enterprise plan but wish to trial Chromatic with your project first.
To setup Chromatic with an “unlinked” project:
- Make sure your code is in a local or self-hosted repository (Chromatic uses Git history to track baselines).
- Sign in using your personal account via any of the supported providers. We’ll use this to authenticate you as a user only so the account doesn’t have to be associated with your work.
- Select “Create a project” and type your project name to create an unlinked project.
Nice! You created an unlinked project. This will allow you to get started with UI Testing workflow regardless of the underlying git provider. You can then configure your CI system to automatically run a Chromatic build on push.
The Chromatic CLI provides the option to generate a JUnit XML report of your build, which you can use to handle commit / pull request statuses yourself. For details, see the configuration reference options.
Unlinked projects have certain drawbacks:
- You won’t get automatic PR checks, so pull requests will not be marked with our status messages. You’ll need to set this up manually via your CI provider.
- Authentication and access control must be handled manually through user invites.
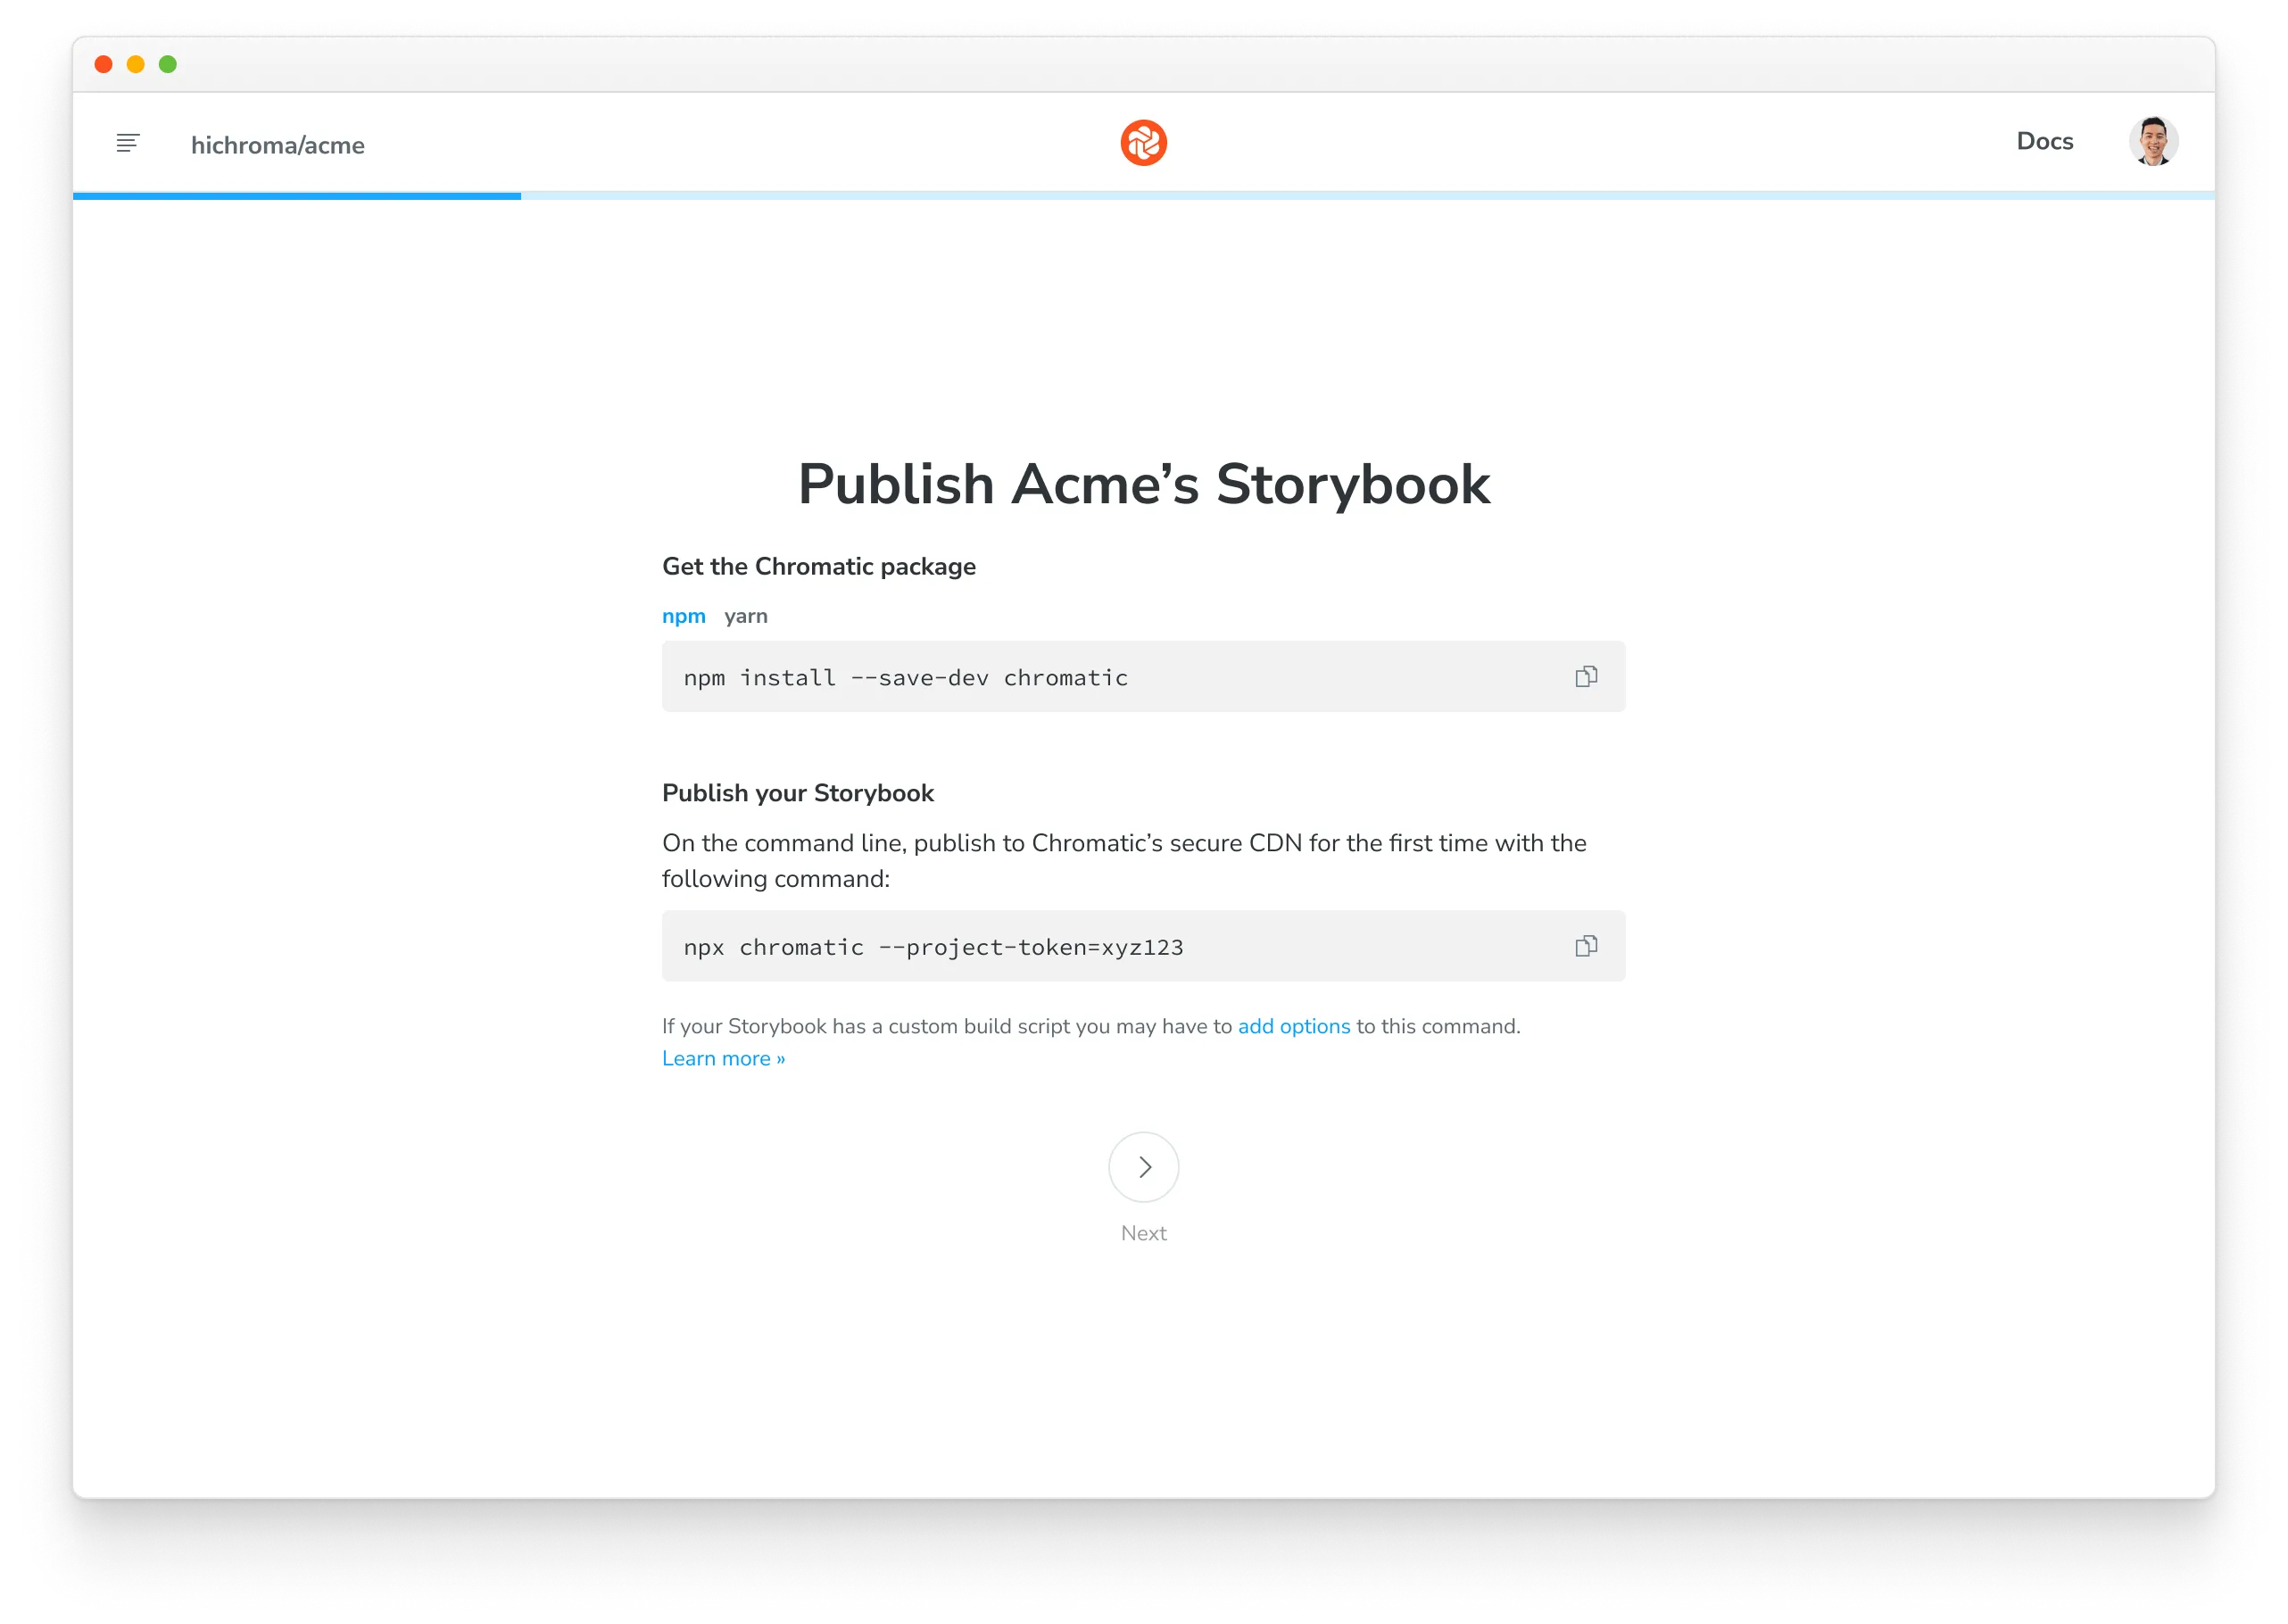
2. Install
Install the chromatic package from npm.
$ npm install --save-dev chromatic$ yarn add --dev chromatic$ pnpm add --save-dev chromaticStorybook 6.5 or later is required. We also guarantee support for officially maintained version of Node, currently 18, 20 & 21. Other Node releases may encounter errors. To switch between Node versions, we recommend using nvm, n, or another version manager.
Learn how to add chromatic to your package.json
The chromatic command will also give you the option of adding an npm script to your package.json so you can run future builds with npm run chromatic/yarn chromatic. If you want to add it manually, it should look something like:
{
  "scripts": {
    "chromatic": "chromatic"
  }
}
The above script command will pick up your project token by reading the CHROMATIC_PROJECT_TOKEN environment variable. After adding the above, ensure you set CHROMATIC_PROJECT_TOKEN when you run builds - such as in your CI config.
If you allowed chromatic to add the above line, it will also have written the environment variable to your package.json. This environment variable can also be set via your CI config for extra privacy.
Setup .gitignore to ignore certain files in your Git repository
Running the Chromatic command may generate certain files for logging and debugging purposes. Exactly which files it generates depends on your configuration, but these entries should likely be added to your .gitignore file:
build-storybook.log
chromatic.log
chromatic-build-*.xml
chromatic-diagnostics.json
3. Run your first build to establish baselines
Once you installed the chromatic package and have a project token, you can establish baselines by running a Chromatic build in a new project. This captures a snapshot of each test in a cloud browser and sets it as the baseline.
Subsequent builds will generate new snapshots that are compared against existing baselines to detect UI changes.
$ npx chromatic --project-token <your-project-token>$ yarn chromatic --project-token <your-project-token>$ pnpm chromatic --project-token <your-project-token>We use the build-storybook script from your package.json by default. If
you have customized the storybook script (for example, adding a static directory with
-s), check that you’ve done the same for build-storybook.
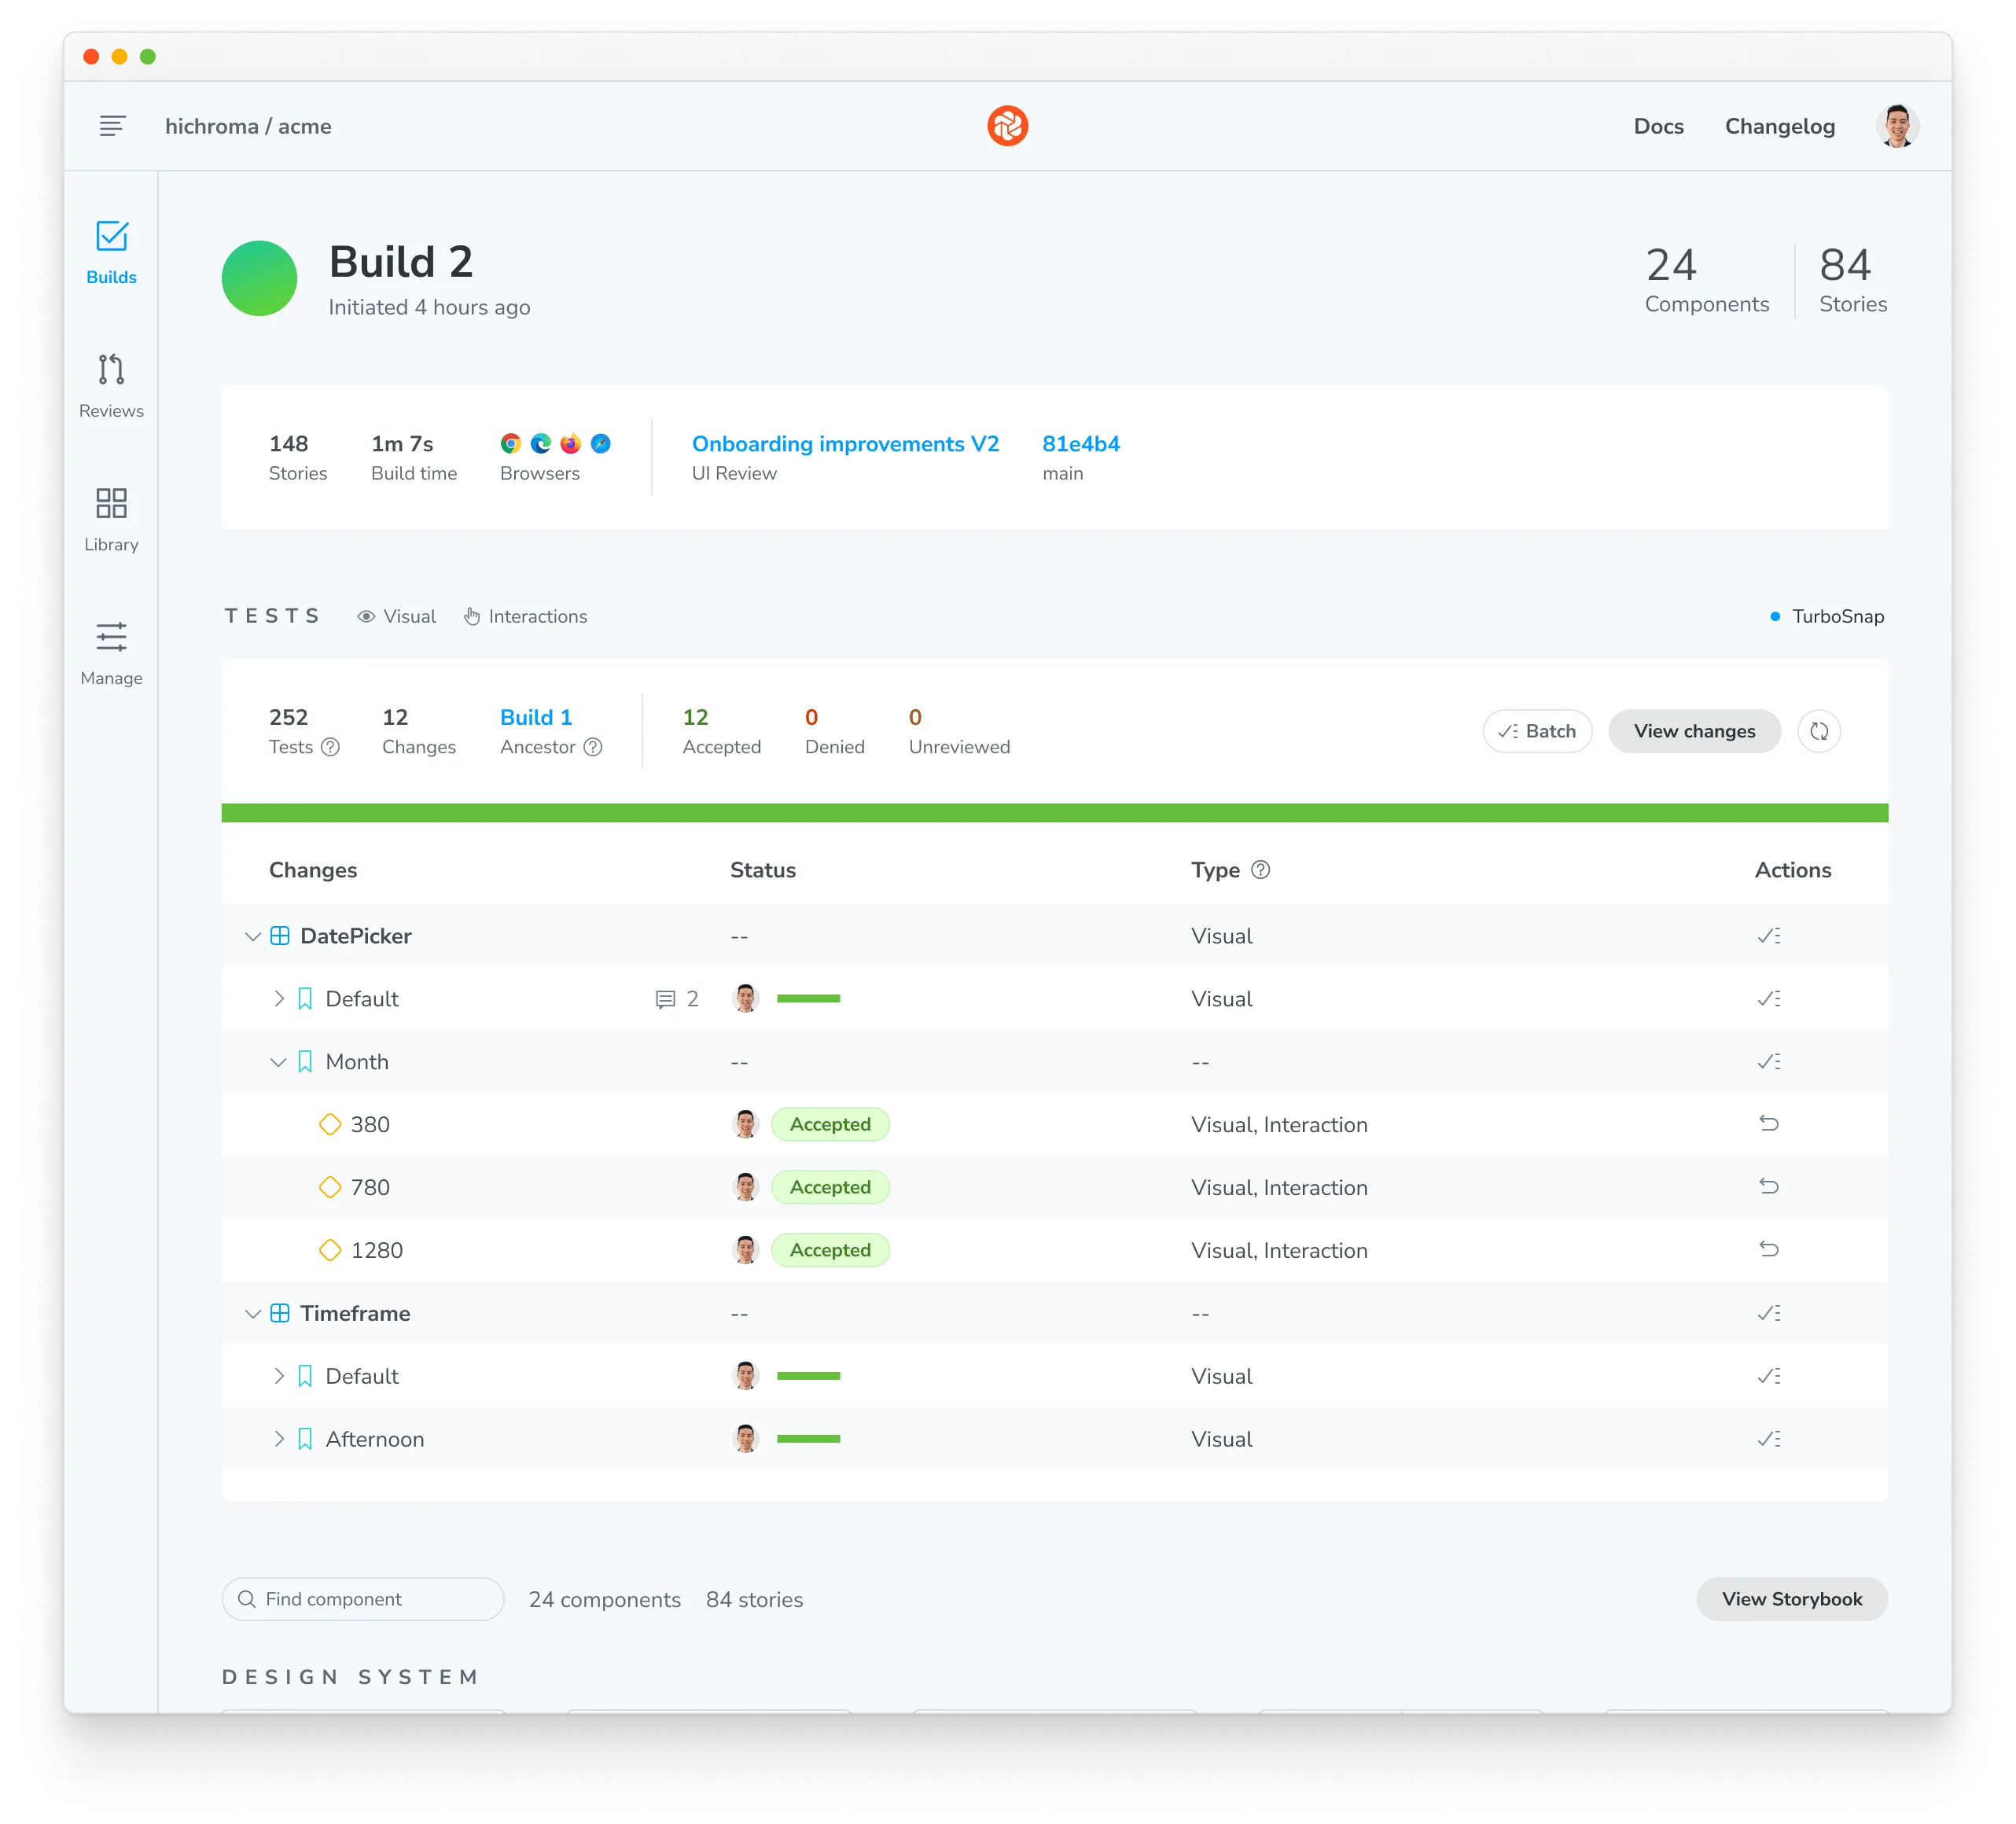
4. Review changes
On each build, Chromatic compares new snapshots to existing baselines from previous builds. Try modifying the UI a bit and running another Chromatic build.
When tests are complete, you’ll see the build status and a link to review the changes. Click on that link to open Chromatic.
Build 1 published.

View it online at https://www.chromatic.com/build?appId=...&number=1.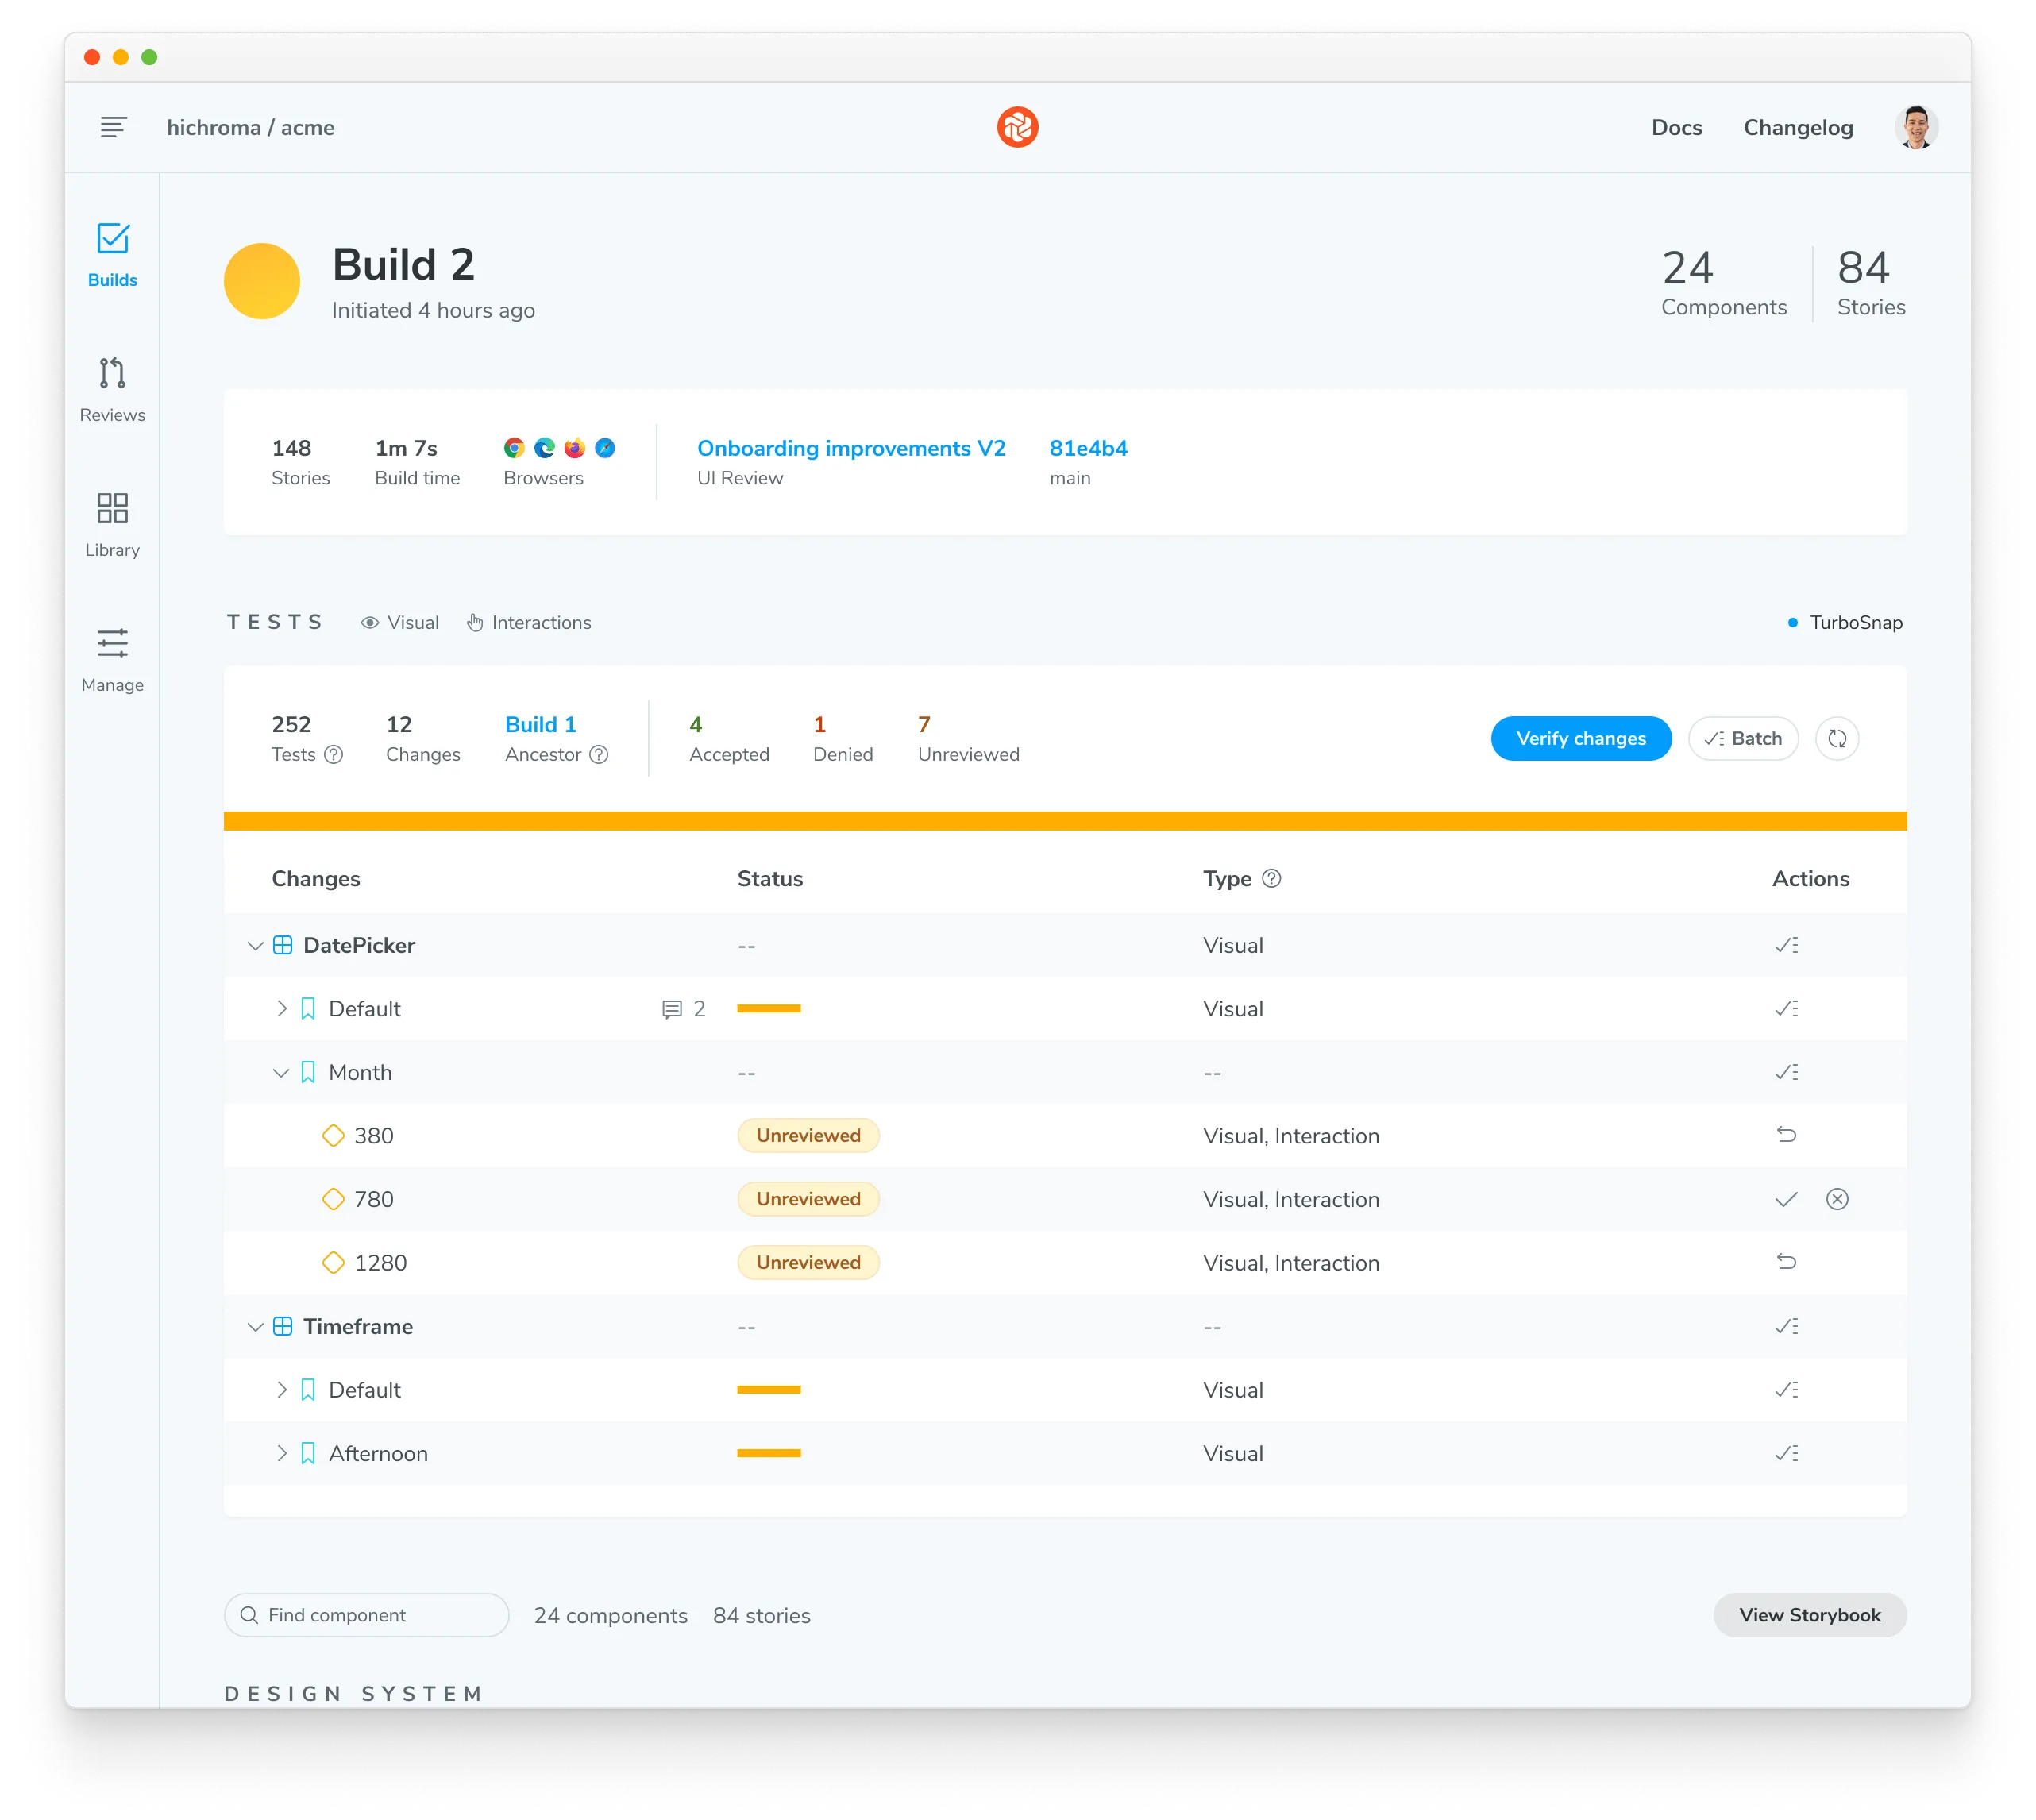
The build will be marked “unreviewed” and the changes will be listed in the “Tests” table. Go through each snapshot to review the diff and approve or reject the change.
✅ Accept change: This updates the story baseline, ensuring future snapshots are compared against the latest approved version. Once a snapshot is accepted, it won’t need re-acceptance until it changes, even across git branches or merges.
❌ Deny change: This marks the change as “denied”, indicating a regression and immediately failing the build. You can deny multiple changes per build. Denying a change will force a re-capture on the next build, even if TurboSnap would otherwise skip it.
5. Discussions
Reviewers can create discussions to point out bugs or ask questions. Discussions are shown within the same interface as Chromatic’s detected UI changes, so all collaborators have the same reference point.
Alternatively, you can click on a snapshot to create a discussion pinned to a specific change and provide precise feedback on the issue. Pair discussions with denying a change to block merging until bugs are resolved.
6. Merge
If you accept all the changes, the build will 🟢 Pass. Future builds whose stories have the same appearance will pass.
If you deny any of the changes, the build will 🔴 Fail. You will need to make code changes (and thus start a new build) to get the build to pass.
When your build is passed (all changes accepted), you’re ready to merge with confidence, knowing that your UI is bug-free. Chromatic will update the PR check for “UI Tests” to reflect the build status.
After you merge your code, Chromatic will also apply accepted baselines to stories on the target branch. That means you’ll only need to accept baselines a single time.
7. PR check for “UI Tests”

Chromatic adds a ‘UI Tests’ badge to the list of status checks for your pull/merge requests. The badge shows errors or changes that need to be reviewed. Require the check in GitHub, GitLab, or Bitbucket to prevent accidental UI bugs from being merged.
Integrate Chromatic into your CI pipeline to get notified about any visual changes introduced by a pull request. Chromatic will run tests when you push code and report changes via the “UI Tests” badge for your pull request.
Next: enhance your UI Testing workflow
You can further refine your testing process and guarantee polished UIs in all scenarios with these strategies:
- Test component functionality with the play function: Simulate clicks, hovers, and more to simultaneously test how components look & function.
- Test dark mode and other component variations: Make sure your UI adapts perfectly to different themes, locales and viewport sizes.
- Test for flexible user preferences: Guarantee your components adapt seamlessly to media features like
forced-colorsandprefers-reduced-motion. - Speed up tests & optimize usage: Learn how to use Chromatic’s TurboSnap to only test stories that have code changes associated with them.
Frequently asked questions
Can I disable UI Tests if I prefer not to use them?
Yes. Go to your project’s manage page, where you can disable UI Tests. Once disabled, Chromatic will no longer add status checks to your PRs for UI Tests.
Can I rerun a build without running my whole CI workflow?
Yes, you can rerun the latest build on any branch outside your CI workflow. Go to the build page to kick off a new build that uses settings and configurations identical to your old build.
What’s the difference between denied and unreviewed changes?
The purpose of denying is to mark changes you’ve looked at but not accepted. After reviewing the build, the list of denied changes helps you track what needs fixing.
When it comes to baselines, denying and leaving unreviewed have the same effect. In both cases, the original baseline is used for comparisons. This means in subsequent builds, Chromatic compares the latest build to the original baseline (not the previously denied snapshot).
Denied changes will be marked as unreviewed in subsequent builds for you to review again.
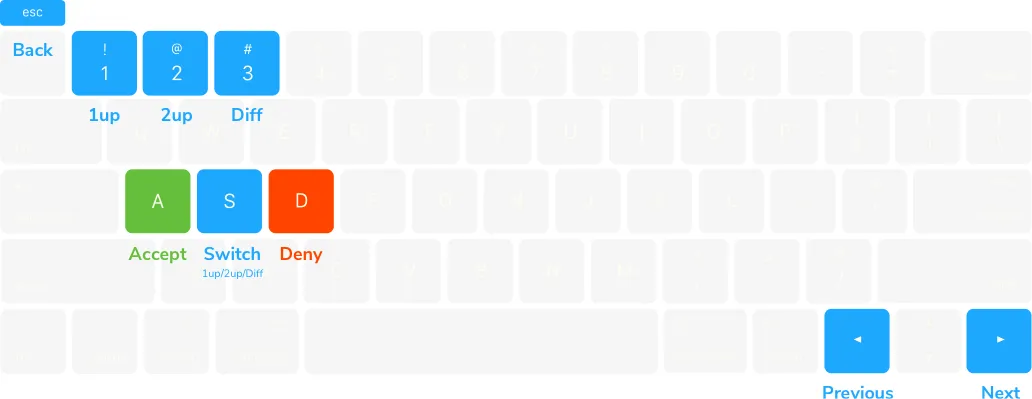
Speed up review with keyboard shortcuts
Use keyboard shortcuts to verify UI changes faster. Protip: Pressing 1 multiple times switches between the baseline and the new snapshot in the 1up view.
| Action | Shortcut |
|---|---|
| Next | ⌥ + → |
| Previous | ⌥ + ← |
| Accept | a |
| Deny | d |
| 1up view | 1 |
| Switch | s or 1 |
| 2up view | 2 |
| Toggle diff | 3 |
| Back to build | Esc |
What about baselines on other branches?
Chromatic automatically changes the baseline snapshots used for each build, depending on your branch. Each branch has a separate set of baselines.
This means you can update UI components on multiple feature branches in parallel without conflicts. When you merge branches, the most recent baseline takes precedence. Learn about branching and baselines »
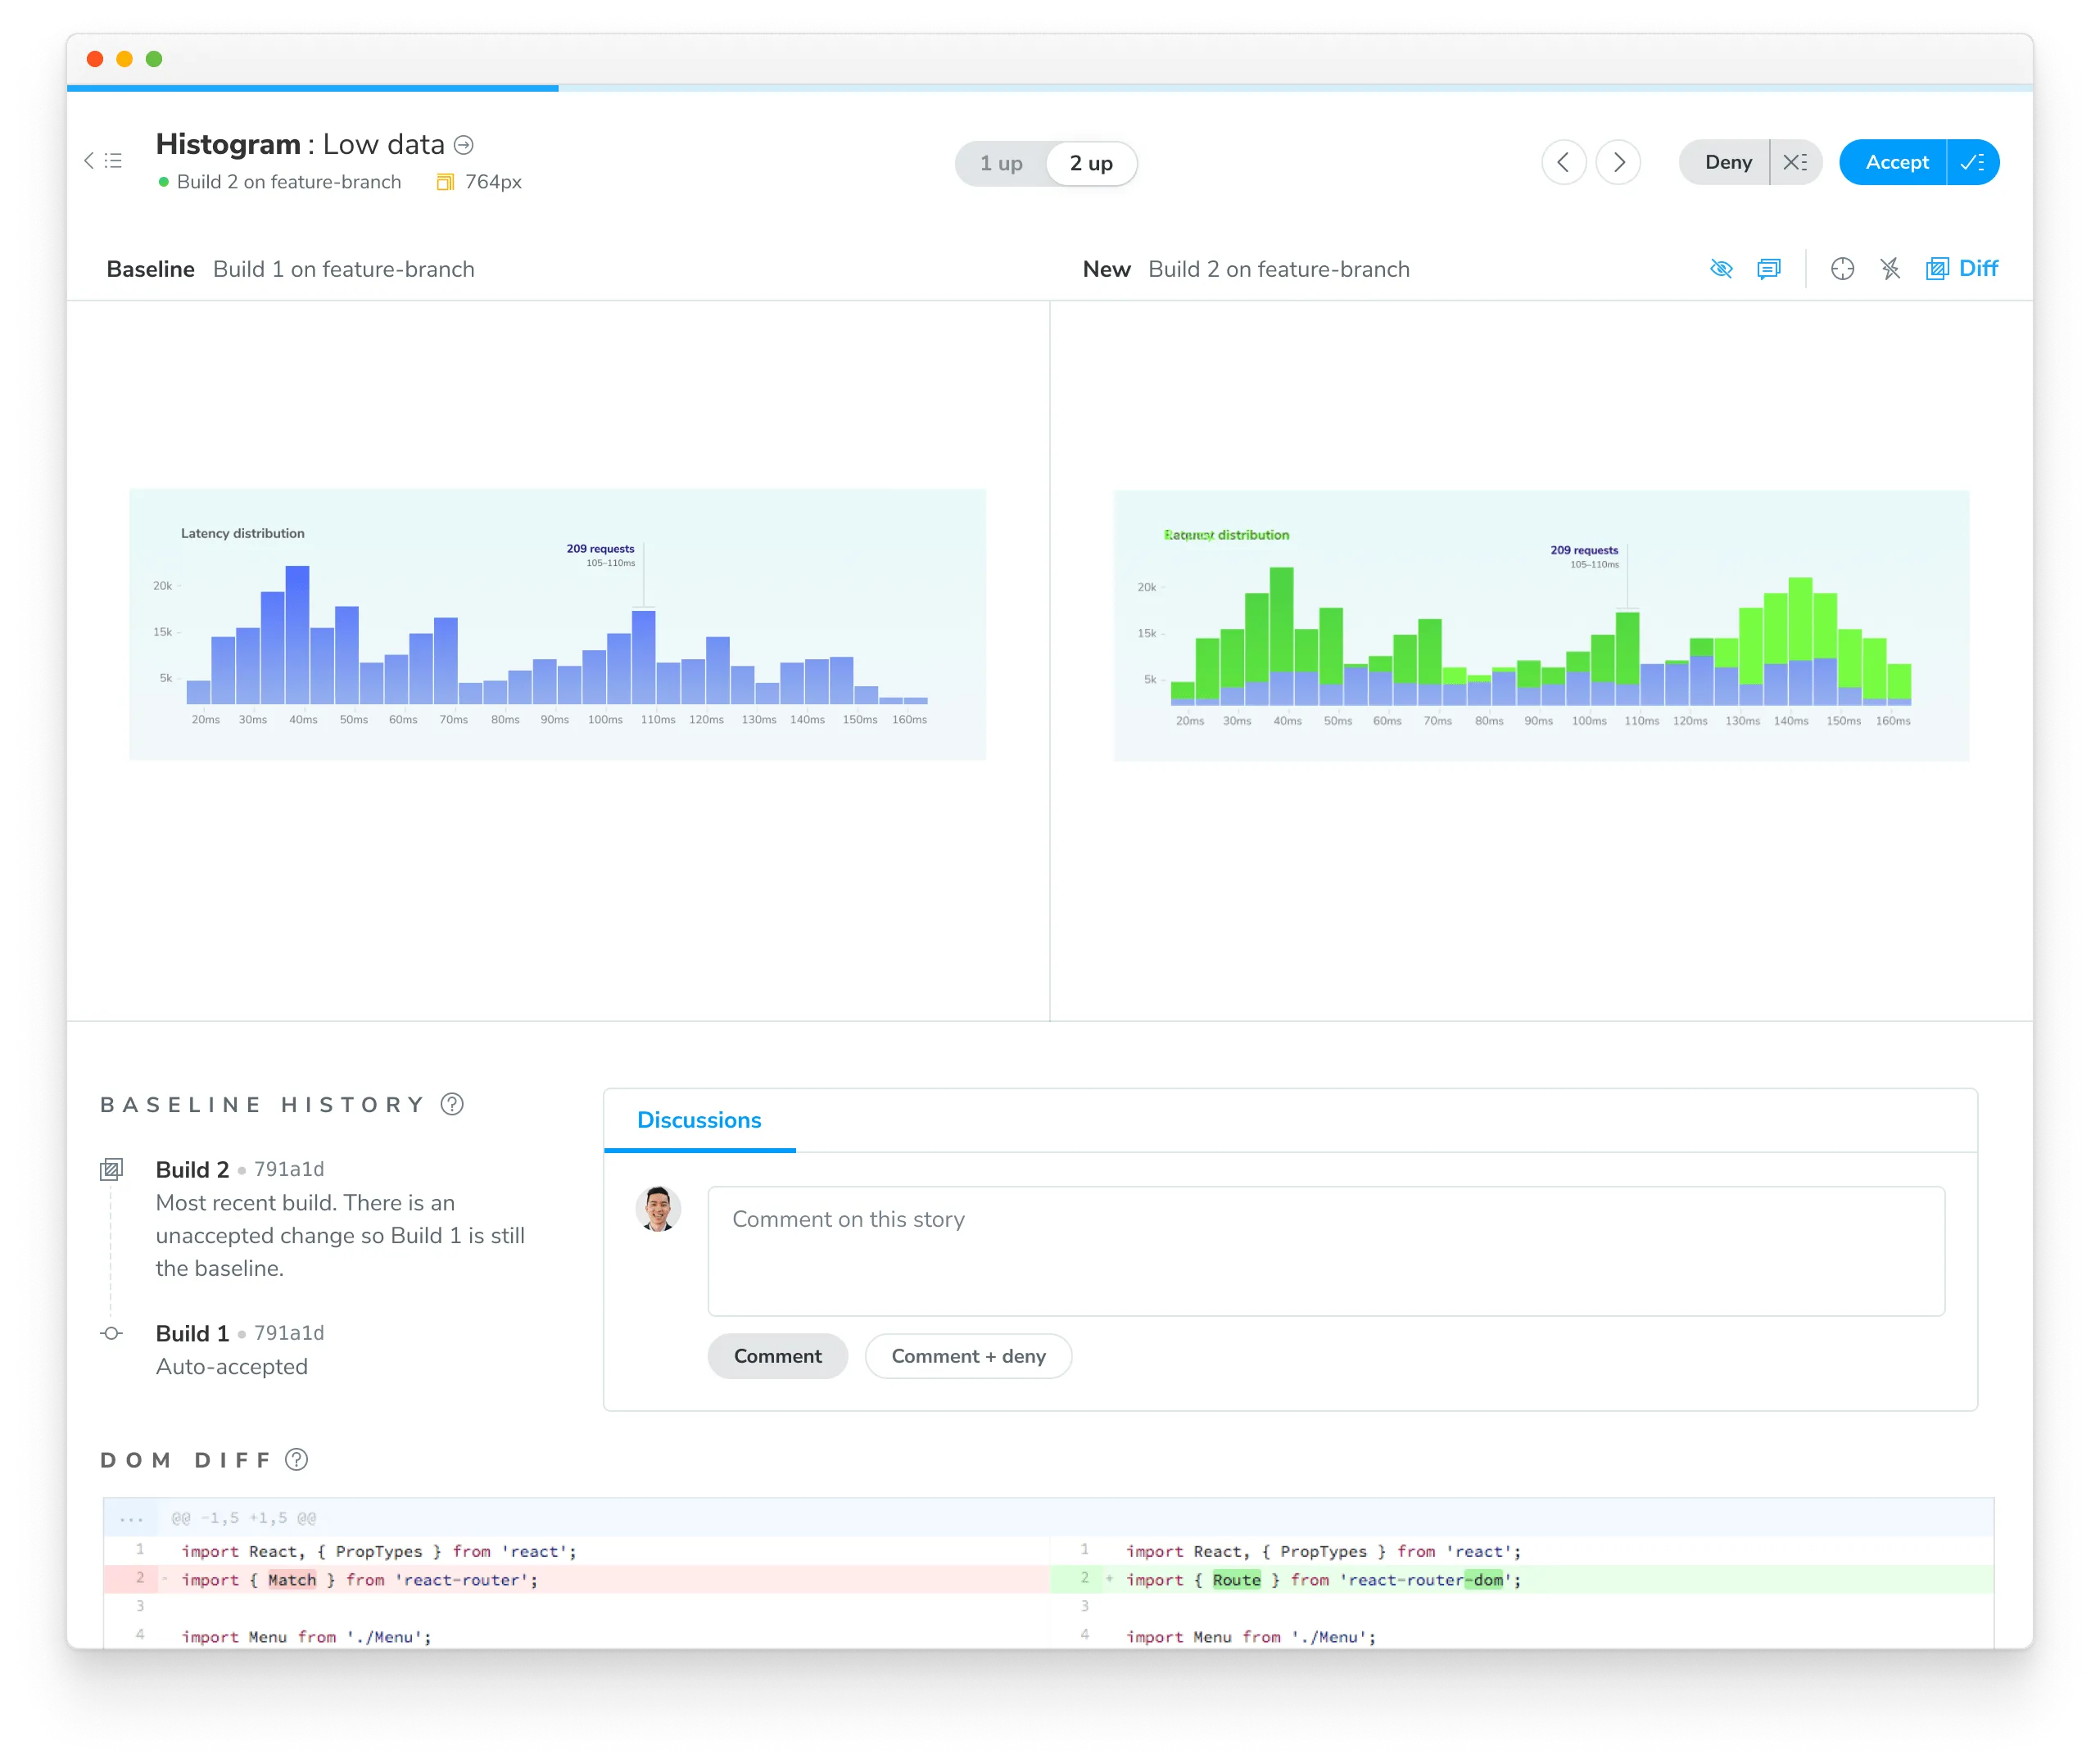
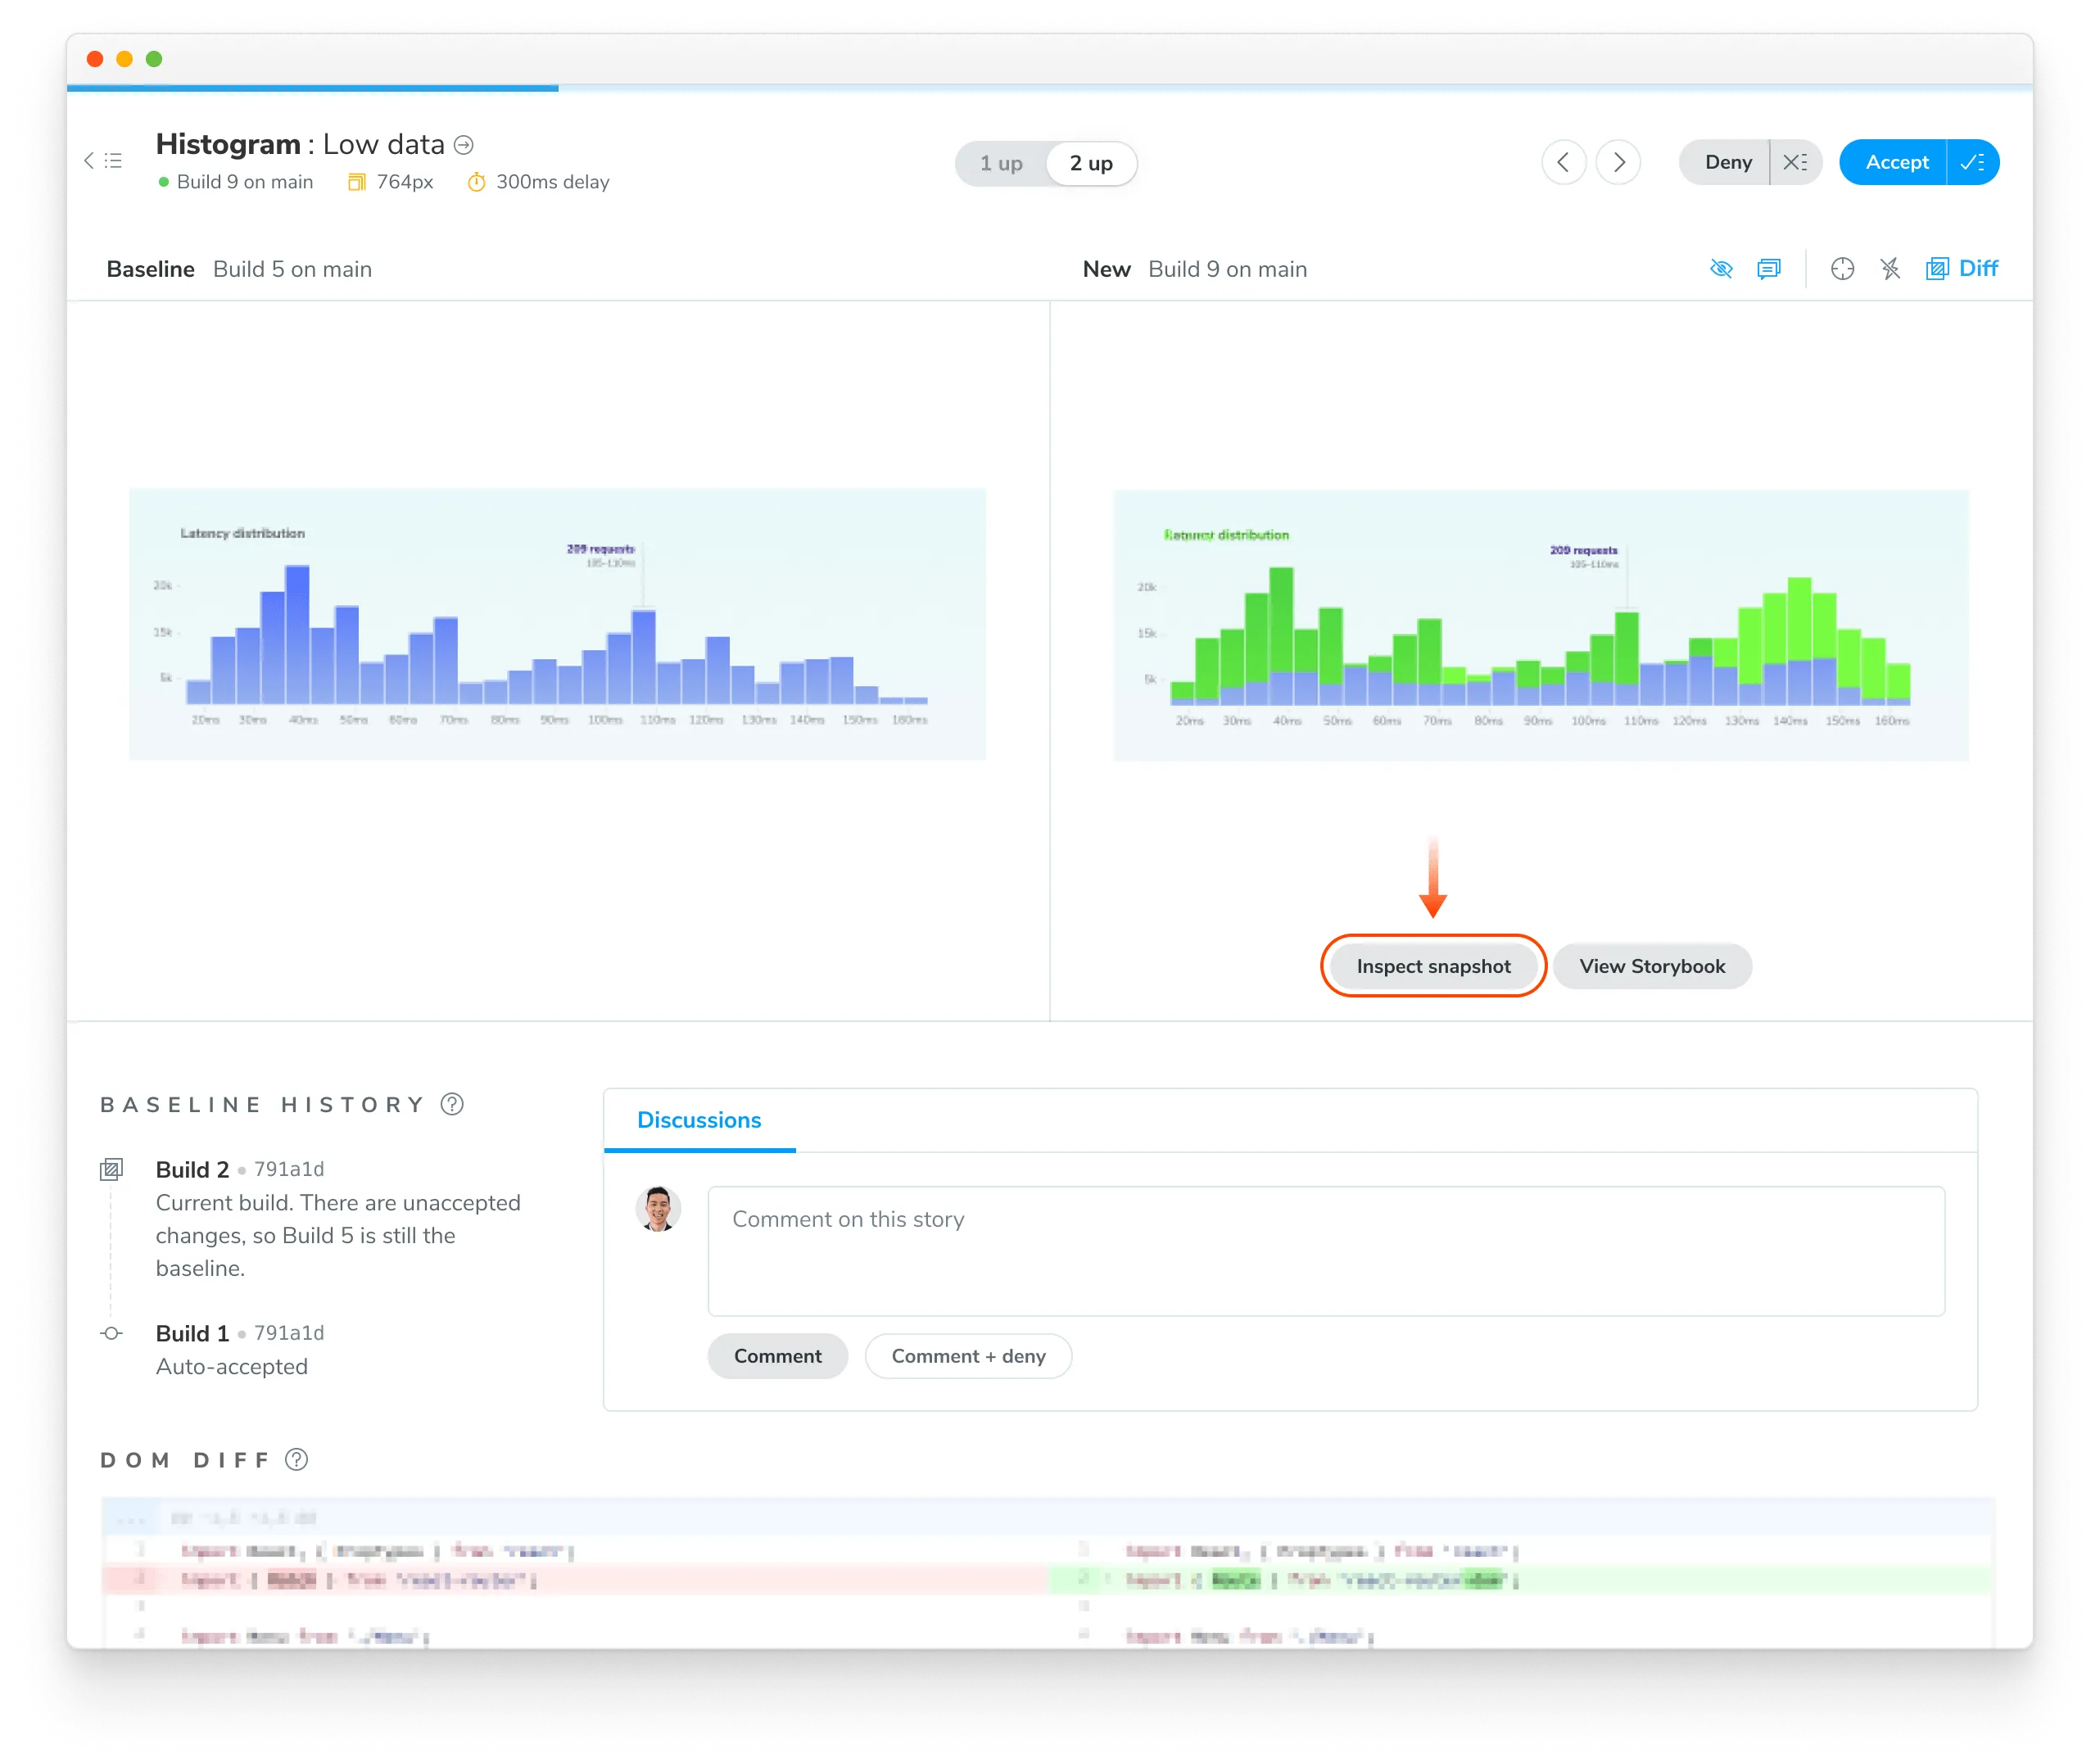
How do I reproduce the snapshot?
Sometimes, you need to look closer to determine why a snapshot is rendering as it does. Along with pixel and DOM diffs, Chromatic displays the interactive page just as it appears in your app and E2E tests.
Click “Inspect snapshot” to open the Inspector. Switch between the “Canvas” and “Snapshot” tabs to compare the live component to the snapshot. Learn more about snapshots here.
Can I retake a snapshot?
Yes, rerun the latest build on your branch to retake snapshots of unreviewed or denied changes.

How are changes on builds different from those listed in the UI Review ‘Changeset’ tab?
UI tests (shown on the build screen) detect changes between builds, specifically between the last accepted baseline and the latest build. This is useful for detecting defects during development and when merging to the main branch to ship.
In contrast, UI Review shows the changeset between the latest commit on the PR branch (head) and the ‘merge base’ (base). Think of it as a code review but for UI.
Why is review disabled on the build page?
Reviewing is only enabled for the latest build on a branch to ensure that only the most up-to-date UI is accepted as a baseline.
Why is commenting disabled on old builds?
Comments are turned off on old builds to ensure that discussions are always on topic and up to date with the latest UI. This prevents the situation where different reviewers comment on different versions of the code.
Can I review the same commit on separate branches?
Yes, but it‘s not a best practice.
Every branch has independent baselines for each test until the branch gets merged. If two builds reference the same commit hash but are on different branches it will be possible to review those builds separately so long as they’re the latest build on their respective branches. We don’t recommend this because you’ll have to review the same change multiple times.
Instead, we recommend regularly reviewing builds to keep feature branches 🟢 passing.
Troubleshooting
Command error git log -n 1
This error often appears when git is not available in your CI environment. Chromatic uses git to associate commits to pull/merge requests and set baselines. We require that an executable git is available (on the $PATH ) of the chromatic script.
Common cases:
- Docker containers: Git may not be installed on certain Docker containers. You’ll need to make the image includes Git.
- Heroku CI: Git history isn’t available by default. You’ll have to give Heroku auth access to your repo so that it can clone it before running CI. This can be unideal. Some customers end up using other CI providers to run Chromatic like GitHub Actions (free) or CircleCI.
- Google Cloud CI: The
.gitfolder is ignored by default. Based on their documentation you can try.gcloudignore. However, some customers have run into trouble with this solution and instead opted to use other CI providers to run Chromatic like GitHub Actions (free) or CircleCI. - You don’t use Git: Enable Git version control in your project and try Chromatic again.
Debug yourself:
- Try running the command manually
git log -n 1 --format="%H,%ct,%ce,%cn"and check if there are errors
Why do my builds timeout
Chromatic takes snapshots very quickly. However, if we lose the connection to your server (for instance if you stop your server mid-build, or your internet connection goes down), builds can time out. Check your connection and try restarting the build.
Why am I getting a ERR_INVALID_ARG_TYPE error?
If you’re encountering the following error in a Playwright/Cypress project:
TypeError [ERR_INVALID_ARG_TYPE]: The "paths[1]" argument must be of type string. Received undefined
  at Object.resolve (node:path:1222:7)
  at binPath (/Users/aaa/dev/temp/chromatic-e2e-examples/node_modules/@chromatic-com/playwright/dist/bin/build-archive-storybook.js:15:2773)
  at /Users/aaa/dev/temp/chromatic-e2e-examples/node_modules/@chromatic-com/playwright/dist/bin/build-archive-storybook.js:15:2630 {
code: 'ERR_INVALID_ARG_TYPE'
This issue likely due to a dependency conflict with Storybook versions in your project. You’ll have the following in your package.json:
"overrides": {
  "storybook": "$storybook"
}
This override force Chromatic to use an incompatible version of Storybook with Playwright/Chromatic, leading to errors. To resolve this, remove the Storybook overrides line from your package.json.
Why do I see “Didn’t find any commits in this Git repository in the last X builds”?
If you run into this situation, it is likely because across the number of unique commits across all builds connected to your project, Chromatic could not find a single one that exists in the repository. This can happen for various reasons (i.e., rebasing, squash merging). However, something has likely gone wrong if all previous X builds’ commits are missing.
If you see this message and can’t resolve the issue, please get in touch with us via our in-app chat or email us at support@chromatic.com.
Why do I see “Failed to find common ancestors with most recent builds within X commits”?
This is an uncommon issue that may happen only in specific cases due to some unusual configuration in your repository. If you see this message, it means that although we found a recent build connected to your repository history (see the item above), we couldn’t find any common history between your checked-out build and any other build in the latest number of commits.
We recommend contacting us via our in-app chat or email us at support@chromatic.com for further assistance.
Why do I see “Build X is based on a commit without ancestor builds”?
Unless you’re creating the first build to establish baselines, when you generate a new build, Chromatic searches your repository history for the most recent build based on an ancestor commit (i.e., commits that are part of the history of the current commit). If it can’t find any, it will show this message. However, this is an uncommon issue that may happen due to the following reasons:
-
You switched between branches and re-ran Chromatic without checking out the changes that installed Chromatic in the first place. In this situation, you can safely ignore the message and continue your workflow.
-
Your repository’s Git history was rewritten via a rebase or squash merge (e.g., via GitHub’s “Squash and Merge” or “Rebase and Merge” options), which you can quickly solve by referring to our CI documentation based on your CI provider.
-
You’re working with a shallow clone of your repository to generate builds. Chromatic needs access to the entire Git history to establish baselines (or at least the history until the previous build), which you can address via our baselines documentation.
-
Some other unusual configuration in your repository is causing the issue, or there is an issue (e.g., an outage) on our end.
If you are in this situation and having trouble resolving the issue, contact us via our in-app chat or email us at support@chromatic.com.
Chromatic doesn’t work with my custom Storybook script
We do our best to interpret your Storybook script in package.json, but you might need to pass additional options to the chromatic command. Check out all the options »
Why do I get errored builds randomly?
Chromatic builds and runs Storybook flawlessly most of the time, but we’re not perfect (we wish). Sometimes builds don’t run due to rare infrastructure issues. If this happens, try to re-run the build via your CI provider. We keep track of these errors to improve the service.
Why is my build failing with the message Cannot run a build with no stories?
This happens if certain stories were disabled via the chromatic: { disableSnapshot: true } option at a higher level.
To solve this you can:
- Remove the top-level
chromatic: { disableSnapshot: true }option - Enable snapshots for specific stories
- Run
yarn storybook-buildlocally and fix the issues in your stories
How can I troubleshoot issues in Storybook?
From Storybook 7.6 onwards, you can use the storybook doctor command to run checks and identify issues in Storybook: npx storybook@latest doctor
This tool helps detect problems like mismatched Storybook versions, duplicated dependencies, and incompatible add-ons. For each detected issue, it offers detailed descriptions, references, and suggestions for follow-up actions. Learn more here.
How can I debug syntax issues in my Storybook project?
You can add the Storybook ESlint plugin to help you debug Storybook syntax issues and comply with best practices.
Why is my build failing with the message ✖ Failed to build Storybook?
To debug an issue with your Storybook project, run the commands below locally and confirm all stories are loading correctly without console log errors and warnings.
npm run build-storybook
npx http-server storybook-static -oUse the same method to debug the following errors:
✖ Failed to verify your Storybook
✖ Failed to publish your built Storybook
✖ Failed to publish build - Failed to extract stories from your Storybook
Why are styles not applied correctly in stories?
If styles are not rendering correctly, there could be several reasons behind that:
-
The order in which stylesheets are loaded.
- In development mode, styles from the preview might be imported earlier than component styles, while in production mode, this order could be reversed. This affects the specificity and, ultimately, the rendering of styles. If this is the case, the styles render but are overwritten by others.
- In Storybook 6 and earlier, stylesheets were loaded upfront, while from Storybook 7 onwards, stylesheets are loaded on-demand when the story is viewed. This affects how styles load.
-
Browser compatibility. If the browser version does not support certain CSS features, styles may not apply correctly. Find browser versions supported by our Capture Infrastructure here.
If you have additional questions, use our in-app chat to contact or email us at support@chromatic.com.